How to access the LiveChat Dashboard
- Click on the LiveChat tab in the left sidebar of the Tars Dashboard.
- You’ll land on the LiveChat Dashboard, which is organized into three main areas:
- Left sidebar - contains three sections: Inboxes (top), Labels (middle), and Status (bottom).
- Conversations panel - lists all conversations for the currently selected inbox.
- Chat window - displays the selected conversation along with options to reply and manage its status.

- Agents can view and reply to conversations in the inboxes they are part of.
- Administrators have all agent capabilities, plus the ability to add or remove LiveChat members from an inbox and review historical conversation data across their inboxes.
1. Inboxes
Inboxes are where incoming conversations are organized. Each inbox can have its own set of LiveChat members, and conversations routed to that inbox will only be visible to the members assigned to it. The Inboxes section is located at the top of the left sidebar. It shows All Inboxes (a combined view of every inbox you have access to), followed by a list of all individual inboxes you’re a member of.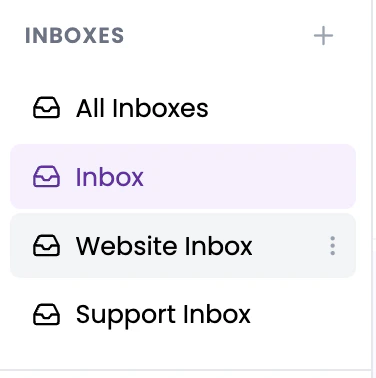
Creating a new inbox
- Click the + icon in the top-right corner of the Inboxes section.
- In the modal that appears, enter a name for your inbox.
- Click Create to save.

Editing an inbox
Hover over any inbox in the list to reveal a three-dot (⋮) icon. Click it and select Edit to open the edit modal, where you can update:- Inbox Name - rename the inbox.
- WhatsApp - toggle on to enable the WhatsApp webhook on this inbox.
- CSAT Survey - toggle on to automatically send a satisfaction survey to leads after a conversation is resolved.
- Agents - a list of all LiveChat members. Check the box next to a member’s name to add them to this inbox, or uncheck to remove them.
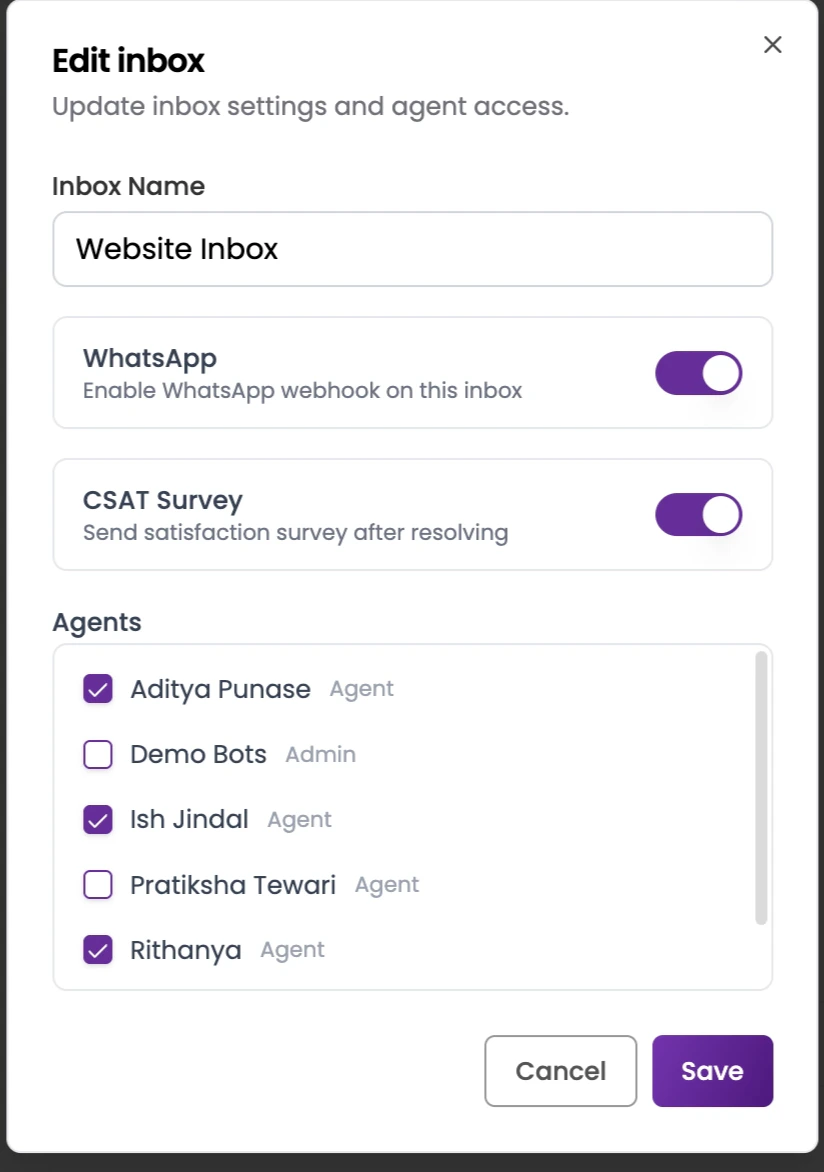
Only Administrators can edit inbox settings and manage inbox members.
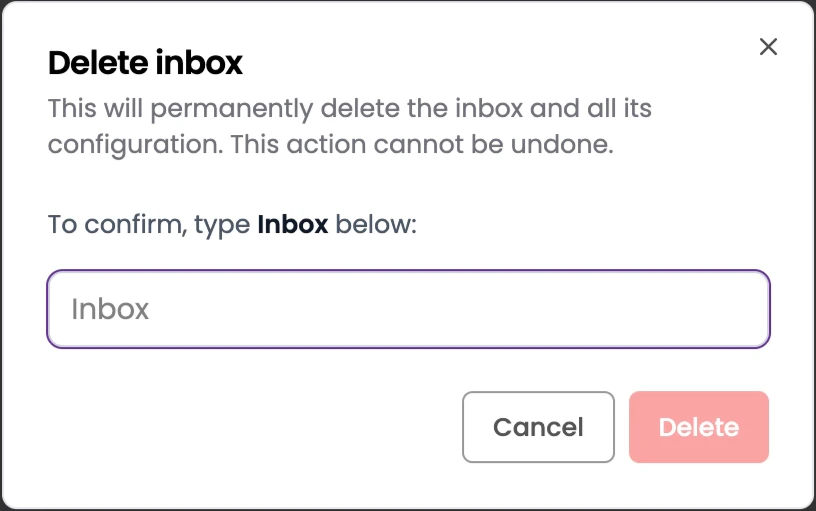
Deleting an inbox
- Hover over the inbox in the list and click the three-dot (⋮) icon.
- Select Delete.
- In the confirmation modal, type the exact inbox name to confirm.
- Click Delete to permanently remove the inbox.
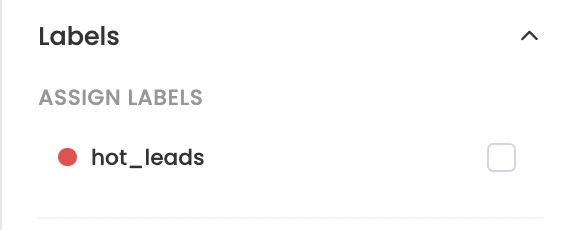
2. Labels
Labels are simple flags you can assign to any conversation to give it a special identity, making it easier to find and group related chats later. A single label can be assigned to multiple conversations, and all conversations sharing that label will appear together under its tab. The Labels section is located in the middle of the left sidebar. It shows All Labels (a combined view of conversations across every label) followed by the list of labels you’ve created.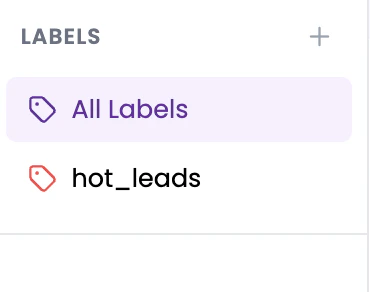
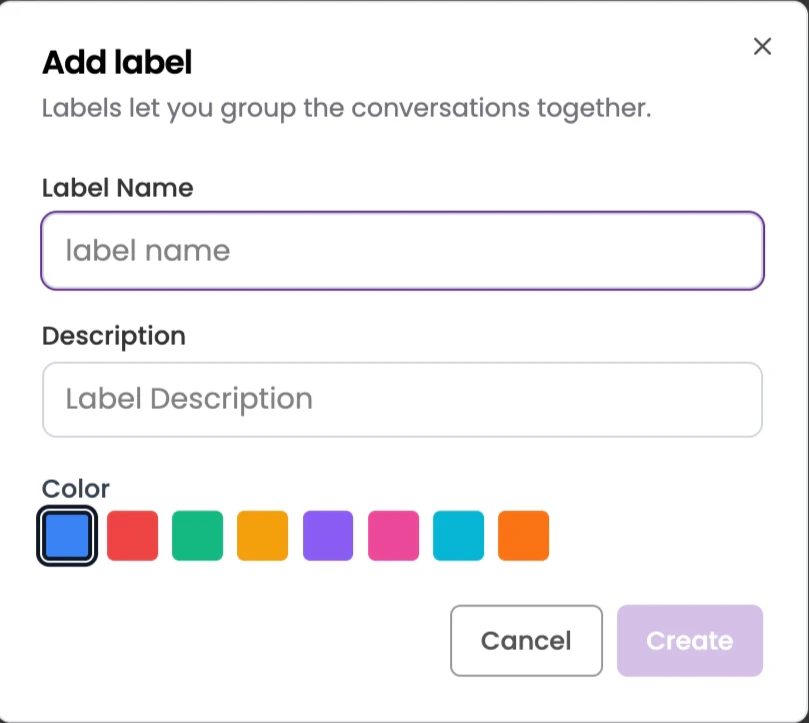
Creating a new label
- Click the + icon in the top-right corner of the Labels section.
- In the modal that appears, fill in:
- Label Name - a short identifier for the label.
- Description - optional context about what this label is used for.
- Color - pick a color from the palette to visually distinguish the label.
- Click Create to save.
Editing a label
Hover over any label in the list to reveal a three-dot (⋮) icon. Click it and select Edit to open the same modal used for creation, where you can update the name, description, or color. Click Save to apply your changes.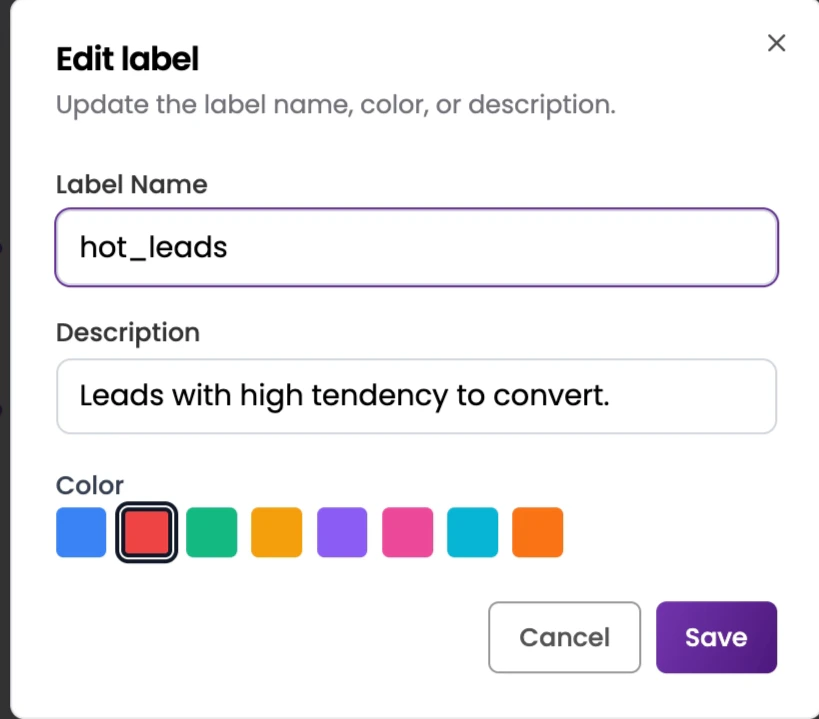
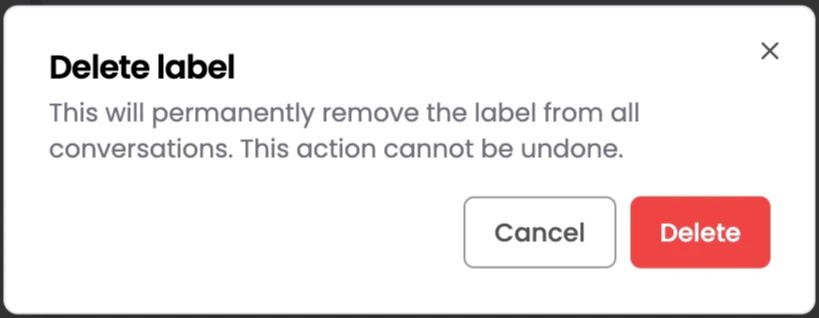
Deleting a label
- Hover over the label in the list and click the three-dot (⋮) icon.
- Select Delete.
- In the confirmation modal, click Delete to remove the label.
3. Status
The Status section lets agents manage their availability for incoming LiveChat conversations. It’s located at the bottom of the left sidebar and always displays the agent’s current status as its title. Click the Status dropdown to change your availability. The available options are:- Online - You’re available to receive new LiveChat conversations. Incoming chats will be routed to you.
- Busy - Use this during your online hours to temporarily pause new conversation assignments without going offline. You won’t be assigned new chats until you set your status back to Online.
- Offline - You won’t be assigned any new conversations until you come back Online.
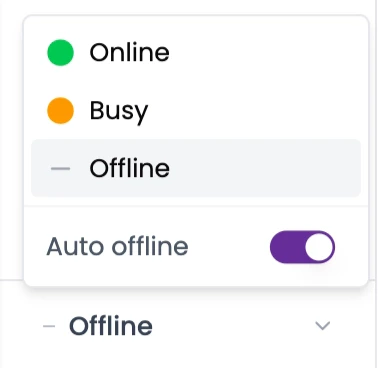
Auto Offline
Inside the Status dropdown, you’ll also find an Auto offline toggle. When enabled, you’ll be automatically set to Offline in real time whenever you move away from the LiveChat screen — for example, if you switch to another tab or window in the same browser on your device. Your status returns to Online once you’re back on the LiveChat screen.4. Conversations
The Conversations panel lists all the chats available in the currently selected inbox. It’s located to the right of the left sidebar and updates based on the inbox, label, or filters you’ve applied.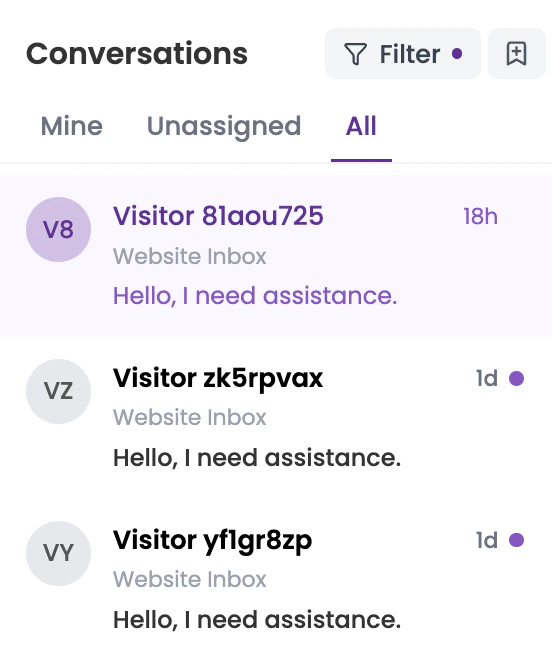
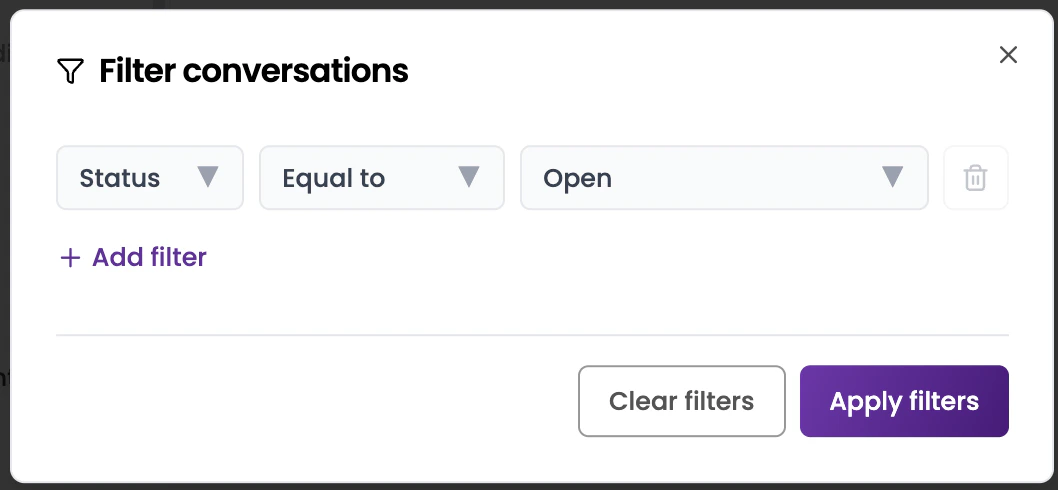
Filtering conversations
A Filter option is available in the top-right of the Conversations panel. Click it to narrow down the conversation list by:- Status - filter by conversation state (e.g., open, resolved).
- Assignee - filter by the agent a conversation is assigned to.
- Inbox - filter by a specific inbox.
- Label - filter by an assigned label.
Conversation tabs
Below the Filter bar, the conversation list is organized into three tabs:- Mine - conversations currently assigned to you.
- Unassigned - conversations that have come in but haven’t been picked up by any agent yet.
- All - every conversation in the selected inbox, regardless of assignee.
Conversation list
The list below the tabs shows all conversations matching the current inbox, label, tab, and filter selections. Each entry displays the visitor’s name or identifier, the inbox the conversation belongs to, a preview of the most recent message, and how long ago the conversation was last active. Click any conversation in the list to open it in the Chat window on the right.
5. Chat Window
The Chat Window is the rightmost section of the LiveChat Dashboard. It displays the full conversation with the selected lead and gives agents everything they need to reply, manage, and wrap up the chat.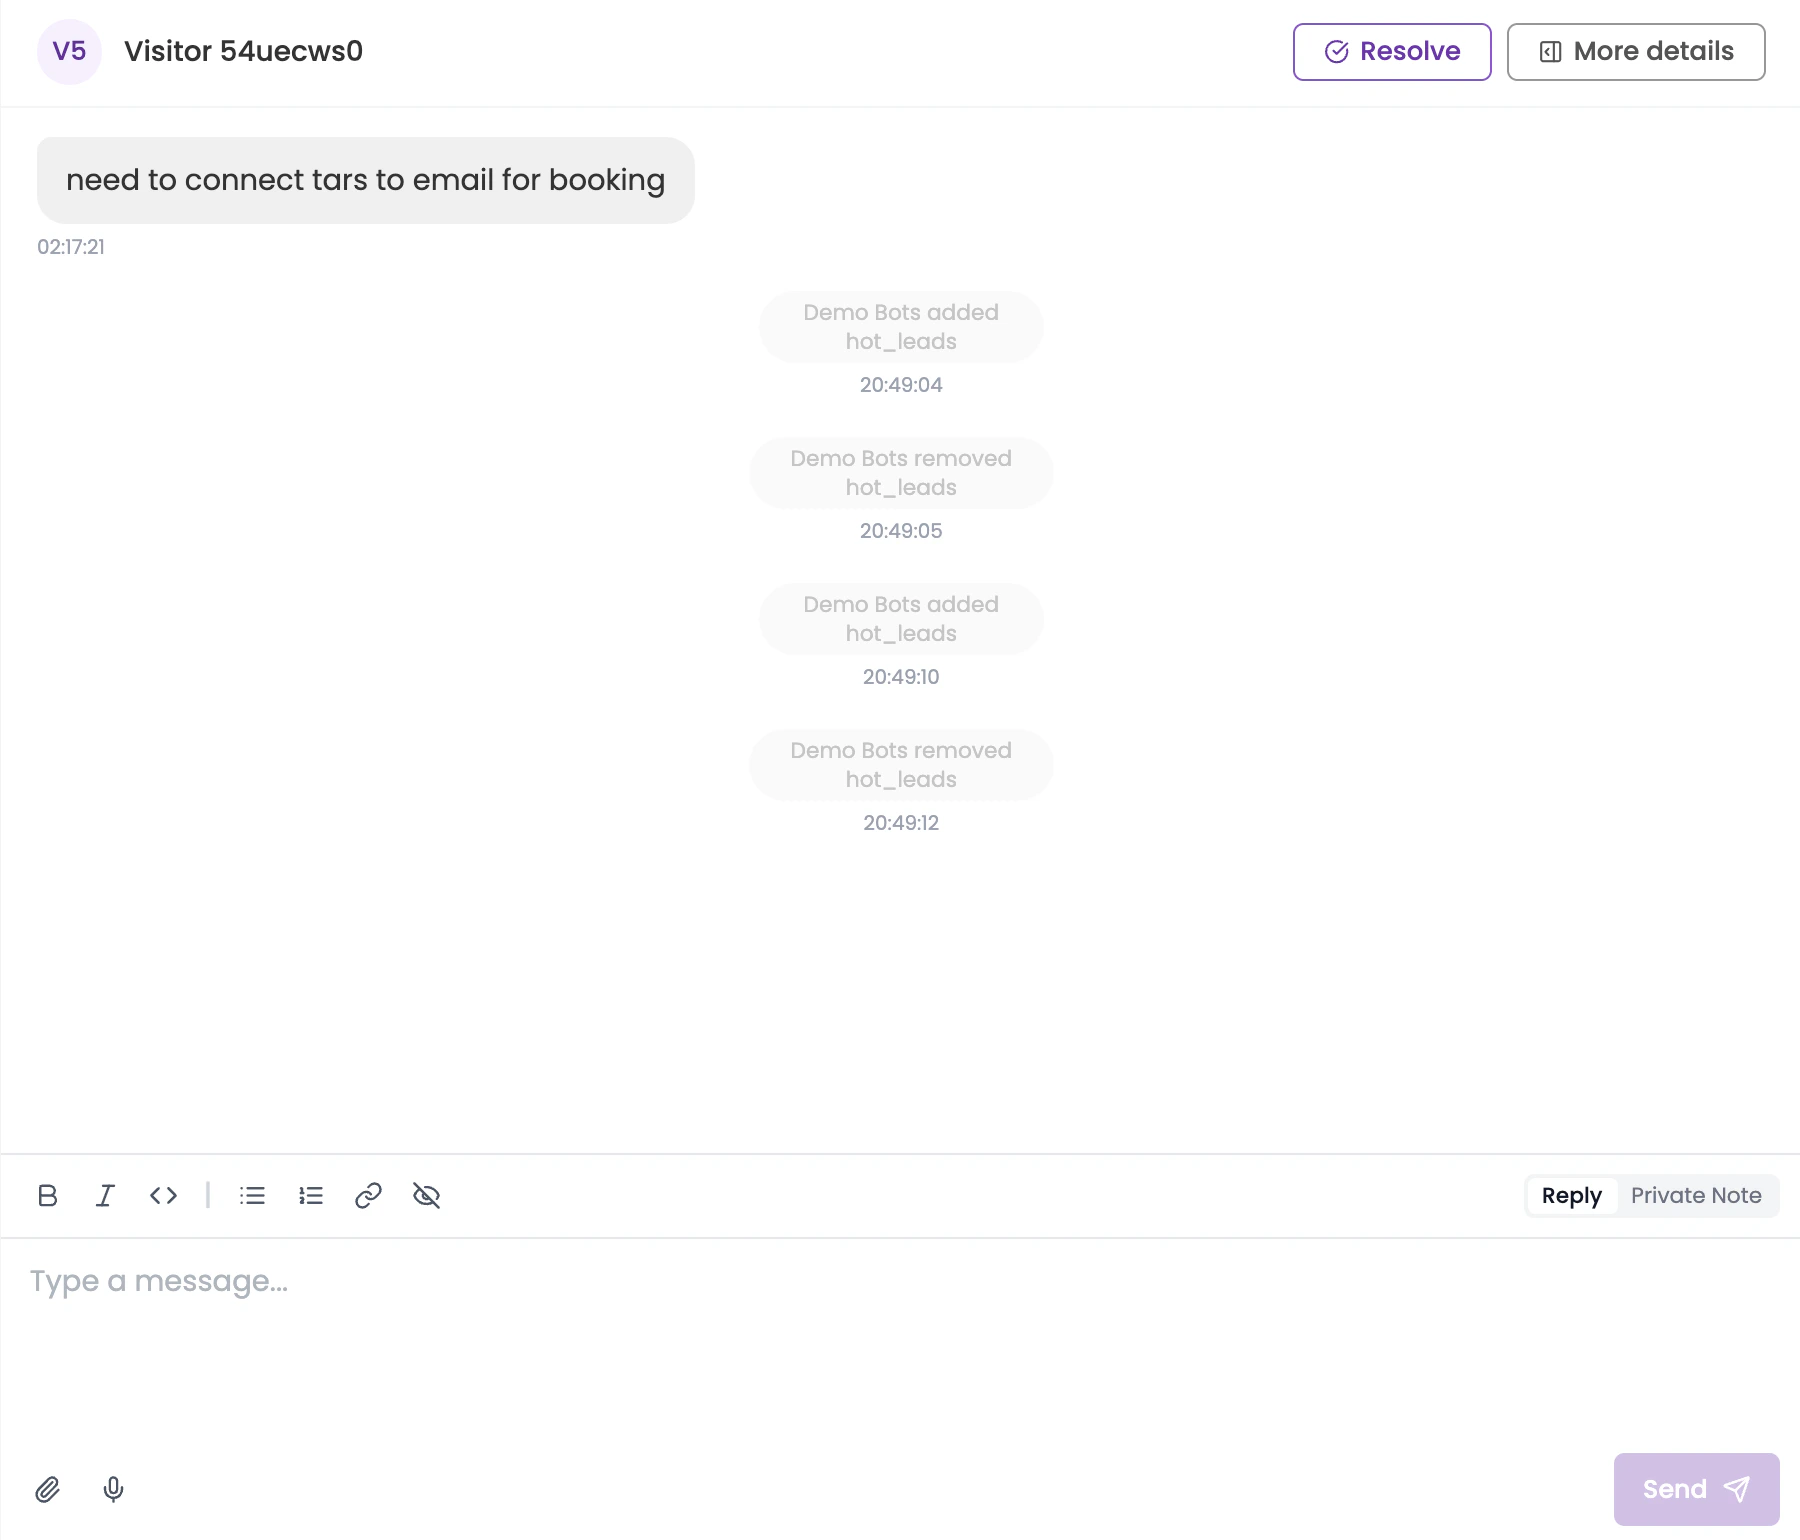
Top bar actions
Two options are available in the top-right of the Chat Window:- Resolve - Marks the conversation as resolved. Once resolved, the chat is removed from the active list but can still be accessed later by applying the appropriate status filter from the Conversations panel.
- More Details - Opens a collapsible side panel on the right with additional information about the lead and the conversation (covered below).
More Details panel
Clicking More Details opens a side panel containing: Visitor Information - Displays the lead’s name, email, and contact number (if available). Assigned Agent - A dropdown showing the agent currently assigned to this chat. If no one is assigned, it shows Unassigned. Click the dropdown to see a list of all LiveChat agents — selecting a name assigns the conversation to that agent.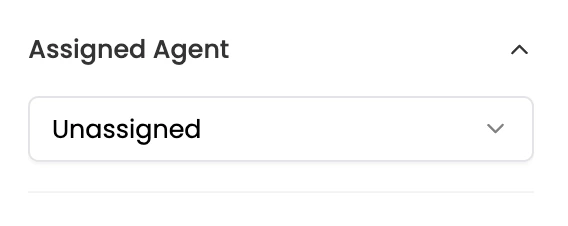
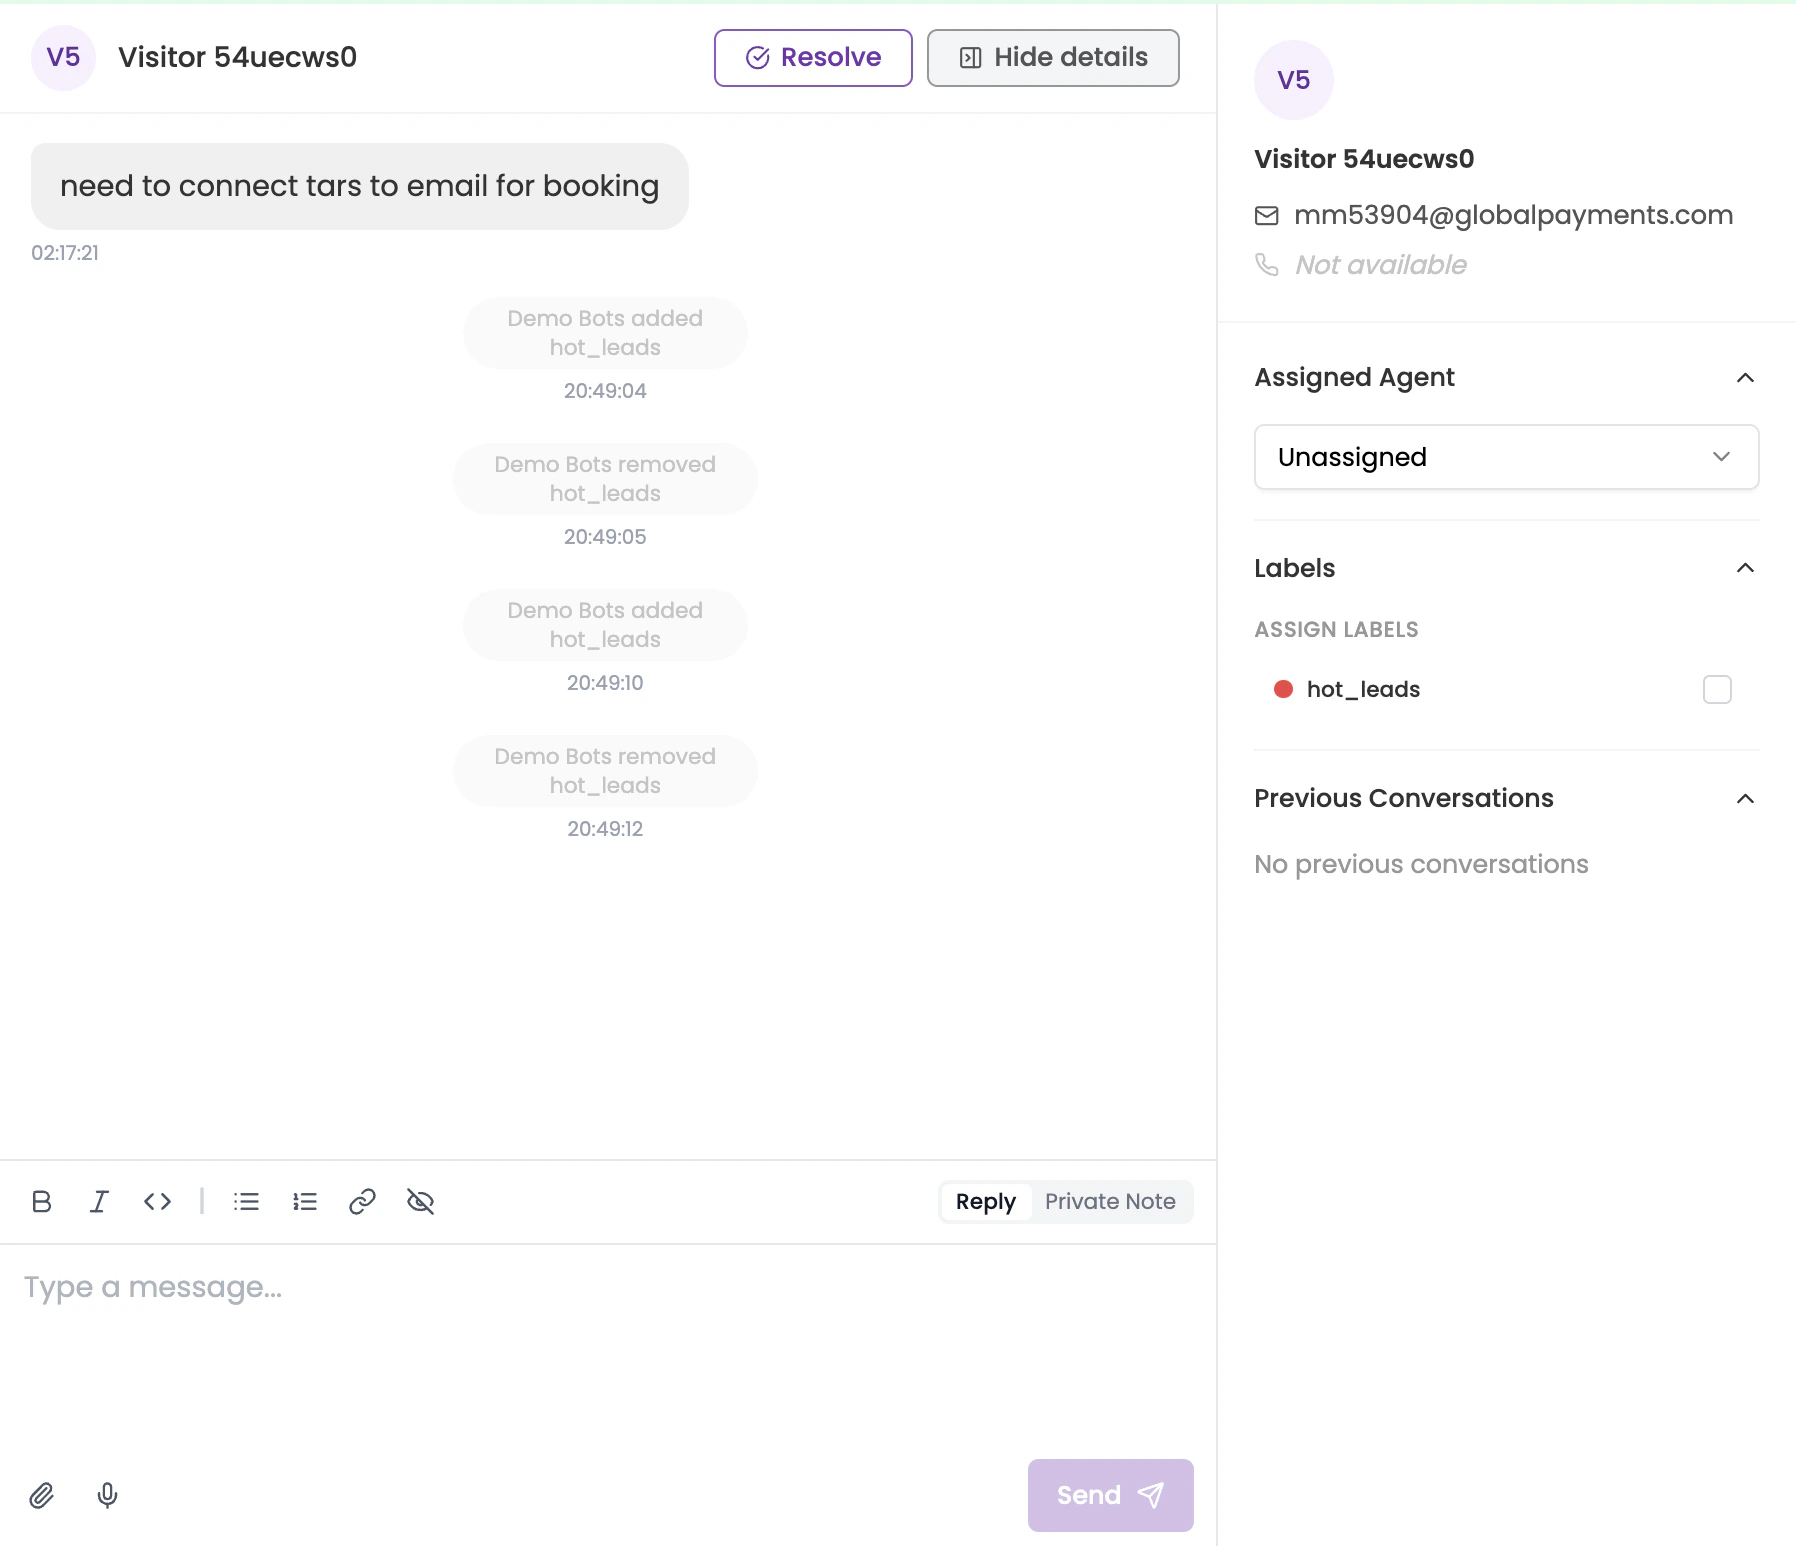
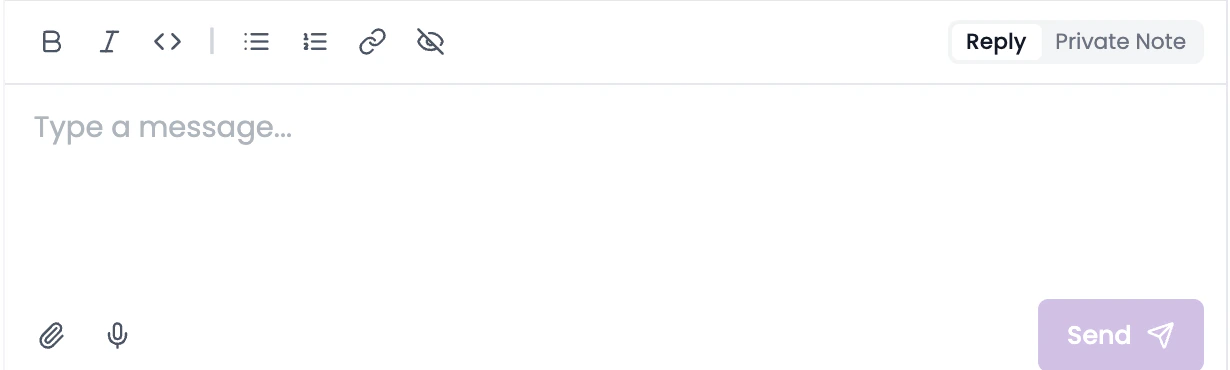
Message composer
At the bottom of the Chat Window is the message composer, where agents type and send messages. Above the input field is a formatting toolbar for bold, italic, code, lists, links, and more. On the right of the toolbar, you’ll find two modes:- Reply - Messages typed here are sent directly to the lead.
- Private Note - Messages typed here are visible only to agents viewing this conversation. The lead will not see them.
Use Private Notes to leave internal context for teammates - for example, a summary of the issue before handing the chat off.
@ to bring up a list of all LiveChat agents. Select a name to mention them — they’ll be notified about the note so they can jump in if needed.
Below the composer, additional options let you attach files (paperclip icon) or record voice messages (microphone icon). Click Send to deliver your message.
Frequently asked questions
What's the difference between Agent and Administrator roles?
What's the difference between Agent and Administrator roles?
Agents can view and reply to conversations in the inboxes they belong to. Administrators can do everything agents can, plus manage inbox settings, add or remove members, and access historical data across all their inboxes.
Can I be in multiple inboxes?
Can I be in multiple inboxes?
Yes. An agent can be added to as many inboxes as needed. Use the All Inboxes view to see conversations across all inboxes you belong to.
What happens when I set my status to Busy?
What happens when I set my status to Busy?
New conversations won’t be assigned to you, but you can still access and reply to your existing conversations. Set your status back to Online when you’re ready to receive new chats.
Can leads see Private Notes?
Can leads see Private Notes?
No. Private Notes are only visible to agents and administrators viewing the conversation. Use them to share internal context with your team.